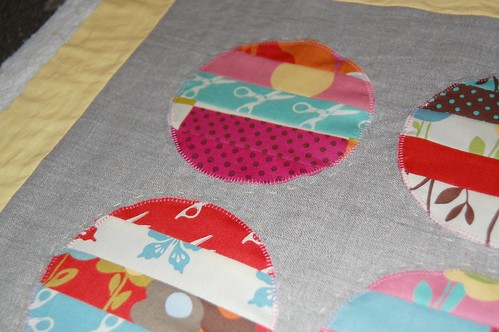
Meet: My Bernina 440 QE

My-Bernina-440-02

Hello! Welcome to my stop on the Meet My Sewing Machine blog hop. I’m glad you’re here!

I own a Bernina 440QE (quilter’s edition) that I purchased in 2011. It was my upgraded-upgrade machine (meaning it was my second good machine since I started quilting.) I tested Berninas when I bought my first nice machine (a Pfaff Creative Expression) in 2010 but decided they were too pricey. Then in 2010, I met a few women at the Dallas MQG who had Berninas and brought them to our Saturday Sews. That was fine. I was still happy with my Pfaff. And then our guild started meeting at the Bernina store and that was the end of it. That machine had to come home and live with me! At that point, I felt like I knew enough about quilting and sewing machines to deserve such a fancy Rolls Royce of a sewing machine.

There are two aspects of the Bernina that I ADORE. First, is the BSR – Bernina Stitch Regulator. I couldn’t free motion worth a swear word on my Brother, but was decent on my Pfaff. With the BSR, I can pretty much do any design I set my mind to and it looks pretty profesh. (You know, professional.)

Giant Scrappy Blocks | Detail

The second thing I love about my Bernina is what they call the Barbie case and all of those Swiss-made all-metal presser feet inside. Droooool.

My-Bernina-440-03

The foot I love most is #37, the 1/4″ foot. It sews a perfect scant 1/4″ seam. It was very smart of Bernina to make the foot numbers so prominent on each foot. None of my previous sewing machines were so user-friendly. There is one feature I would love to have – an automatic thread cutter.  The Berninas are also kinda noisy compared to many other sewing machines. Maybe that’s due to the all-metal feet and parts. Even so, I would recommend this machine to a friend. In fact, most of my friends have one. At retreat, we sit at the Bernina Table. It’s the cool kids table.

The Bernina is a majah (said like a Spice Girl, specifically Victoria Beckham) upgrade from my first beginner baby machine, a Brother something-or-other.  It was a $200 super basic machine that quickly fell apart when I started making a quilt every other week (no joke. I did that.)  I also own a Brother serger that is rarely used, and I do have  have a few other dream machines I’d like to own if I had the space.

Janome Horizon MC7700-QCP

These machines were in all of the workshops at QuiltCon so I spent an entire day sewing on one. And it was a dream. Super quiet, all of the bells and whistles. This would definitely be a delight to sew on every day.

Juki TL-2000Qi FS

I’ve never even tested this machine, but I’ve heard good things. It would be my quilting machine and I’d use my Bernina mostly for piecing.

Long-arm of Some Variety

I’ve gotten to play on a long-arm a couple of times, and I would LOVE to own one. That would necessitate a MUCH larger sewing room, but a girl can dream.

Speaking of sewing rooms, mine is jammed full of stuff very nice.  I have three windows so I get lots of natural light and hardwood floors that make it easy to sweep up sewing messes (charm pack dust, thread explosions, etc). I keep most of my fabric stashed away in the closet, but I like to display pre-cuts and neatly folded fat quarters because they just look so pretty.

Moda Pre-Cuts | My Studio
{Moda fat quarter bundles in aqua DVD holders from the Container Store}

studio: Aug 2012
{My cutting table from Martha Stewart’s collection for Home Decorators}
studio: Aug 2012
{Vintage shelf with pre-cuts. I store a lot of stuff in various glass jars like these and these.}

vintage chair - after
{My sewing chair – a vintage one that I painted and reupholstered}

fat quarter storage
{CD storage unit from Pottery Barn filled with fat quarters}

That’s my machine and my sewing space all in one. Thanks for stopping by and don’t forget to visit the others stops and sign up for the linky party.

SUNDAY, MARCH 17
Erin @ Sew at Home Mummy
Angela @ Heart of Charnwood
Shannon @ Crafty Turtle
Amy @ Stitchery Dickory Dock

MONDAY, MARCH 18
Ebony @ Love Bug Studios
Jaclyn @ Jaclyn Quilts
Amy @ Diary of a Quilter

TUESDAY, MARCH 19
Kara@ Me and Elna
Nerissa @ Nissa Made
Elizabeth @ Don’t Call Me Betsy

WEDNESDAY, MARCH 20
Carly @ Citric Sugar
Celine @ Espritpatch
Patti @ A Yankee in Queen Liz’s Court

THURSDAY, MARCH 21
Stacey @ The Tilted Quilt
The Jolly Jabber Staff (Chelsey, Kimberly, Debbie)
Rachel @ Sew Happily Ever After!

FRIDAY, MARCH 22
Erika @ Sews it All (Bernina)
Lisa @ Vintage Modern Quilts (Bernina) {ME!}
Adrianne @ On the Windy Side (Bernina)

Wonky Cross Blocks

My friend Amanda over at Panda Bear Quilts is requesting help to make quilts for her nieces who just lost their father. She is asking for wonky cross blocks which are simple and fast to make. I whipped up these four in about half an hour.

Wonky Cross Blocks

If you would like to help Amanda, you can read her blog post {here}.


Tutorial: Project Life Layer Masks

Tutorial-layer-masksOne of my goals for March is to FINISH my son’s baby album (which is a Project Life album, using the Baby Edition for Him…it started out as a regular Project Life album but I changed it up completely when the baby editions were released even though I was about 80% complete with the original album. That’s another post entirely.) I’ve only been able to squeeze in a few hours to work on the album in the last few weeks but I’m so close – just a few photos to have printed and some things to cut on the Silhouette Cameo. Since I’m going back and filling in instead of spending hours sorting/processing/finding photos, etc., I’m taking a bit more time with each page than I normally would, experimenting with the digital version of the kit (purchased in addition to the paper version – You can find the digital kits {here}).

I imagine most people are either digital OR paper scrapbookers, but I really like a mix of both. My goal was to add in more elements of the Baby Edition since much of what I originally did used such a variety of papers + the Clementine + Cobalt kits. What I really wanted was a more cohesive album. To achieve that, I’ve added digi elements where I can by using layer masks with the journaling cards from the digi kit.

Tutorial-layer-masks-10

{Note: You need the mask so you can create the frame around the photo. You could just try to crop and resize your photo to fit within the border of the card, but it’s actually easier to create the mask.}

This is how I did it:

1. Open the Project Life digital card that you want to use. I’m trying to fill up some 3×4 slots so I chose a 3×4 card.

Tutorial-layer-masks-01

2. Crop out the outer edges of the card so that you only have the center part left. Make sure your crop lines look pretty even all around the card.

Tutorial-layer-masks-02

3. Save this cropped version as a new file with a new name. (I named mine PL-3x4mask.png)

Tutorial-layer-masks-03

4. Click the undo arrow to restore the original version of the 3×4 card.

5. Open up the cropped image and drag it onto the 3×4 card as a new layer. Make sure the cropped image is the top layer.

6. Open the photo you’d like to use. Drag it onto the 3×4 card as the top layer.

Tutorial-layer-masks-06

7. From the Layers menu, select “Create Clipping Mask.” (or click CTRL+G on a PC) Adjust the size and placement of your photo as desired.

Tutorial-layer-masks-05Tutorial-layer-masks-07

8. Save the file as a jpeg for printing. It’s that simple.

Tutorial-layer-masks-08

I also played around a bit with some of the elements from other cards in the set.

Tutorial-layer-masks-11

Fun, right?  I extracted the “swoosh” element from the card on the top right and added it over the photo with some text. I’m thinking of using that same “swoosh” shape as a cut file for the Silhouette Cameo. I think it would make great week number cards.

Follow my blog with Bloglovin

Cotton Candy Quilt

Cotton Candy Quilt

This quilt is made almost entirely of Moda Candy – those cute 2.5″ squares that now come in almost every new line. I’ve been stashing them for years, before they were ever sold in quilt stores. I had quite a collection of Summer in the City by Urban Chiks that came as freebies in a pattern I found on clearance (yeah, I bought them all. Sorry if you are new to fabrics because that line is awesome but long out of print). I mixed in some others I got at quilt market as samples or freebies at guild meetings. I also added a charm pack or two of Plume by Tula Pink to make the quilt a useable size.

This is a basic disappearing 9-patch pattern.  I used a bright pink as my centers, but I kinda wish I’d gone for something softer. Next time.

Cotton Candy Quilt | Detail

It’s quilted with my favorite Aurifil thread and it’s a dream. I swear by that light gray color (#2600). It really does go with everything. The quilting pattern is free motion swirls, which is something new for me. This quilt needed lots of quilting and a playful pattern that offered a little more excitement than the basic stipple.

Cotton Candy Quilt | Binding

My favorite part of this quilt is the binding. I just love that polka dot print! The colors really are like candy. One day I will make a quilt in that color palette (any excuse to use that binding again.)

Cotton Candy Quilt | Backing

I have to share a photo shoot outtake…

Cotton Candy Quilt

Ben is always drawn to the quilts in our house. I find it very endearing since I made all of them. ;) .

Dimensions: 54″ x 54″

Fabrics: Summer in the City, Dream On, and Hullabaloo by Urban Chiks; It’s a Hoot by MoMo, Central Park by Kate Spain, Plume by Tula Pink, Breakfast at Tiffany’s at Fig Tree and Co.; Snippets by American Jane, Funky Monkey by Erin Michael (binding & backing)

Quilting Thread: Aurifil 50 wt #2600

Started: July 2011

Completed: March 2013

Meet: My Machine Blog Hop

Sew at Home Mummy


I’ve been asked to participate in a blog hop all about sewing machines.  I love my Bernina so of course I said yes! If you are looking for a new (or first!) sewing machine, this blog hop will help you out a lot. Here are the scheduled dates and stops:

SUNDAY, MARCH 17
Erin @ Sew at Home Mummy
Angela @ Heart of Charnwood
 Shannon @ Crafty Turtle
Amy @ Stitchery Dickory Dock

MONDAY, MARCH 18
Ebony @ Love Bug Studios
Jaclyn @ Jaclyn Quilts
Amy @ Diary of a Quilter

TUESDAY, MARCH 19
Kara@ Me and Elna
Nerissa @ Nissa Made
Elizabeth @ Don’t Call Me Betsy

WEDNESDAY, MARCH 20
Carly @ Citric Sugar 
Celine @ Espritpatch 
Patti @ A Yankee in Queen Liz’s Court

THURSDAY, MARCH 21
Stacey @ The Tilted Quilt
The Jolly Jabber Staff (Chelsey, Kimberly, Debbie)
Rachel @ Sew Happily Ever After! 

FRIDAY, MARCH 22
Erika @ Sews it All (Bernina)
Lisa @ Vintage Modern Quilts (Bernina) {ME!}
Adrianne @ On the Windy Side (Bernina)

There will be giveaways and other fun stuff along the way. See you then!

Tip: Half Square Triangles

Half square triangles, no marking

I have a big stack of half square triangles (HSTs) to sew today, and I remembered a trick I saw on Pinterest a few months back. (Here is the original pin.) It doesn’t give the full details for HSTs so I figured out my own method and thought I’d share it here.

1. Find a piece of thin cardboard that is as long as your squares from point to point. I used a piece of Kraft paper.
2. Use your rotary cutter and ruler to trim a 1/2″ wide strip from your cardboard.
3. Use your ruler and a pen to find the center of the strip (a 1/4″ from either edge) and mark a line from end to end.
4. Line your HST squares together and place the strip from point to point. Sew right at the edge of the strip.

NOTE: This method works perfectly if you are making a quilt top that exclusively uses HSTs. But if your quilt top uses HSTs within a block, you need to make a small adjustment to achieve a scant 1/4″ seam. After you mark the center line of your strip, take your ruler and line your 1/4″ mark up exactly with the line…then shift it slightly so that the 1/4″ mark on your ruler is just to the left of the drawn line. Then trim off the excess (which is hardly anything, but that’s your “scant” 1/4-inch).

Tada! Perfect HSTs…no marking. I sewed my entire pile one way, trimmed them apart, and sewed the other side of the strip. Then cut your HSTs in half and press. So much better than marking each piece, right?

Silhouette Cameo for Quilting

My Silhouette Cameo is one of my favorite crafting tools.  If you’ve never heard of the Silhouette Cameo, it is a digital cutting machine. I would describe it as a printer that instead of printing the design, uses a tiny blade to cut the design on paper, fabric, vinyl. etc. It even looks like a printer (it does have a sketch feature that I haven’t used). There is also a smaller (and less expensive) version called the Silhouette Portrait:

I got my Cameo last year and have almost exclusively used it to cut paper – banners, stuff for Project Life albums, etc.

2012-06-06 22.43.59

Moroccan tile film I cut for our bathroom cabinet

2012-10-18 12.13.27

Bat garland in our front window

It’s a really fun tool, and I’ve enjoyed designing graphics and word art for my Project Life albums and to hang on our walls. But I’ve found a new use for it that I had to share. I just started working on an applique-intensive project {Green Tea and Sweet Beans} and the thought of tracing all of the templates made me feel tired. So I did what any crafty gal would do and figured out an easier way. Freezer paper is my preferred method of applique so this may not be helpful to you if you do back-basting or some other method. (Here is a quick run-down of how to do freezer paper applique.)

1. Scan your templates.

2. Open up the scanned image in the Silhouette Studio software and crop out everything except the part you need.

3. Use the trace function to create a cut line for your shape. Ungroup or “release compound path” to clean up any little dashes or marks that don’t belong.

4. Trim some freezer paper to 12×12 (or whatever the size of your cutting mat).

5. Place freezer paper with the shiny side up on the cutting mat. Load in the Silhouette Cameo and cut! Use gentle cut settings. The built=in setting for 65lb pattern paper works okay for the shapes I was cutting, but I’ll go down to a 2 or 3 on the blade setting next time. You do not need to double cut.

Then all you do is apply your templates to your fabric with a hot iron and applique using your preferred method. I finished two blocks for my quilt last week:

Clamshells
Clamshells

Hexagons
Hexagons

My Little Helper
Ben

I’ve already cut the templates and started prepping some more blocks for an upcoming road trip I’m taking. I love this quilt!

Retro Whimsy Bella Solids

Retro Whimsy Bella Solids

Moda Fabrics has a series of free patterns designed for solids called the 12-Pack. You can see the last released set {here}.  I’m working on a pattern from the new set using the lovely stack of Bella Solids above. I like to name my fabric stacks because I’m a nerd like that so this one is called Retro Whimsy. The colors are sort of dreamy and cupcake-like.  I’m seeing strawberry cake and chocolate frosting. Mmmm.

The Bella Solids shown (from top to bottom) are:

Pale Pink | 9900-26
Sisters Pink | 9900-145
Pink | 9900-9900-61
Popsicle | 9900-143
Citrine | 9900-211
Pesto| 9900-233
Gray | 9900-83
Stone | 9900-128
Betty’s Brown | 9900-125
Robin’s Egg | 9900-85
Seafoam | 9900-191
Turquoise | 9900-107
(shown twice, one piece is for the binding)

So that’s what I’m working on today. And now I need a cupcake.