Learn to Quilt: Tools of the Trade
This post is part of my Learn to Quilt series. You can find all related posts {here}.
If you’ve ever been inside a quilt shop, you will see that there are endless supplies, notions, and tools used for quilting. Fabric is just the tip of the iceberg.
Sewing Machine. The most important thing to look for in a sewing machine is one that works well and almost any machine will do as long as you take care of it. Sewing machines are classified as mechanical, computerized, or electronic. Mechanical sewing machines have basic functionality all controlled by simple push buttons. Computerized machines have an electronic interface and may be able to hook up to a computer for embroidery. I am not a fan of electronic machines where all of the sewing functions are controlled through a touch-screen interface. I find them slow to operate (scrolling through screens) and the electronics will go bad long before the mechanical parts do. My Bernina is computerized and I LOVE IT, but I would like to have a mechanical machine as a back up or for other tasks like quilting (Jukis are a good option for this).
Sewing Machine Feet. Your machine will come with basic feet. You will also need a 1/4″ foot, a walking foot (for quilting but also useful for sewing heavy home dec items, and a darning foot (used for free-motion quilting). There are several varieties of darning feet so ask for a demo if you can so you can choose the appropriate one for your uses.
Sewing Table. If you don’t have a dedicated sewing room, this may be your dining room table. If you have a space dedicated to sewing, go for a drop-in table where the sewing surface of your machine is even with the table surface. Sewing tables can be shockingly expensive but there are some DIYs on the web that will show you how to make your own. I don’t have a drop-in table and that is a must for me in my next sewing space.
Sewing Chair. Look for something comfy like an office chair. There are some cute ones on the market with built-in storage or you could find a vintage one to make over. I like one with wheels for piecing but I switch to a stationary chair when quilting because I find I can’t get the right leverage when I’m working on a big quilt.
Rotary Cutter. Start with your basic 45 mm rotary cutter. It’s a useful size for lots of applications. I use my 60 mm cutter most often, though, just because I like the larger cutting surface. It seems faster and more accurate to cut with a bigger blade. A 28 mm rotary cutter is useful for small blocks or for use with curved templates.
Cutting Mat. Get the biggest mat that you can (budget-wise and space-wise). 18×24 is the smallest that you should go for everyday use. Anything smaller and you better be making quilts with tiny blocks! (The typical quilt block is 12.5 inches for reference). You need a mat made for use with rotary cutters so buy one from the quilting section at your store (online or brick and mortar). I’ve used an Olfa mat for ages and they are fine, but when my large one is worn out, I’m going to replace it with an Elan Miracle Mat. I use a 24×36 mat for everyday use in my sewing room and I have a couple of smaller mats for retreats/classes.
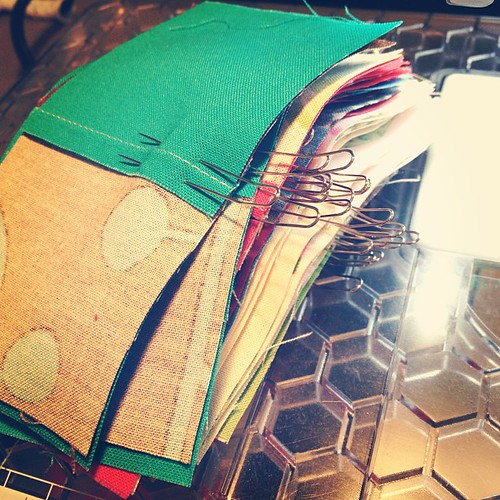
Pins. They make special pins for quilting that are very fine and have glass heads. They even make cute ones with buttons and flowers as the pin heads. But I think all you really need are Clover Fork Pins. These are unmatched in awesomeness for matching points on your blocks and your quilt top.
Here is a stack of 4-patch blocks that I pinned using the Clover Fork Pins:
Iron. I have two irons that I use regularly and neither one is expensive. There are a couple of brands that you’ll read about on quilting blogs (Oliso and Rowenta) and they are both big bucks. I use an el cheapo Toastmaster iron that was $6.99 at Target (they don’t seem to have any quite that cheap anymore). I love it because it gets super hot and never shuts off. I also use a Black & Decker Classic Iron. This one frustrated me for a long time because the ridges on the sole plate tend to get stuck on fabric edges and make wrinkles, but I love the weight of it for pressing a block or finished quilt top.

Fabric. We’ll talk a lot about fabric in Lesson 5 so just know that you need it…and lots of it. 
Batting. Batting is the stuff that goes between the quilt backing and quilt top. There are endless varieties and my brand of choice is the one I can purchase economically in bulk. I buy Warm & White Cotton Batting in a queen-size roll from JoAnn. I use a 40% or 50% off coupon and wait until they have free shipping over $200. My first roll made about 20 quilts, and I’m four or five quilts into my second roll. If you can’t store that much or don’t want to spend so much upfront, buy it by the yard at a big box store like JoAnn with a coupon. Get your specialty kind (fusible, wool, etc) at a quilt shop.
Templates and Rulers. There are so many special rulers for quilting on the market that it can be overwhelming. I’m going to list the ones that I find essential:
- Squares in various sizes (4.5″, 6.5″, 9.5″, 12.5″),
- 6″x24″ is the ruler I use most
- June Tailor Simple Circles Rotary Cutting Rulers
- June Tailor Shape Cut Pro Ruler (so fast for cutting strips!)
There are many different brands of quilting rulers for your basic ones (the squares and a 6×24)…Test them out before you buy. You may not be able to actually use them to cut in the store, but hold some fabric underneath the ruler and see how easy it is the see the edge of the fabric. You should also check for “grippy-ness.” Some quilting rulers are made with sandpaper-like gripping points on the back to help keep the ruler in place while you cut.
Cutting Table. This should be at least as big as your cutting mat, but larger is even better. I use a Martha Stewart cutting table with lots of storage and I love it.
Other useful sewing items:
- a bin or basket to set next to your machine for pins, scissors, etc.
- small, sharp snips to have near your while piecing
- a small bin on your cutting table for fabric scraps (the really small ones that will end up in the garbage)
What are your sewing must-haves? Let us know in the comments!
See you on Thursday for Lesson 4 – Learn to Quilt: Quilting on a Budget.