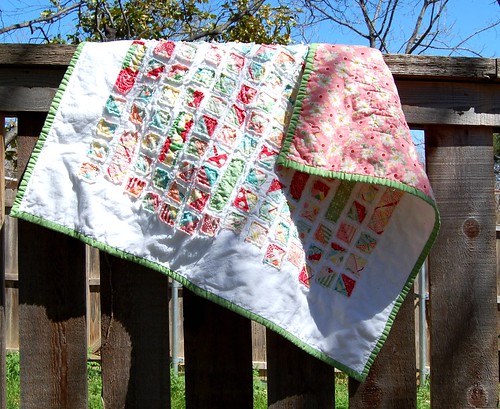
Brick Pattern Rag Quilt Tutorial
This was a super easy and quick project. Before baby, I was never a fan of the rag quilt, but now I understand the appeal. Babies loves those fluffy raw edges and these things sew up fast (a couple of hours, included cutting and ragging time). This version is almost crib sized but will grow with Ben to be a stroller quilt/lap quilt/snuggle quilt. I used fabric by Bunny Hill Designs for Moda. The collection is called Puttin’ on the Ritz. A couple of the prints are really for babies:

But overall, it’s a pretty sophisticated line of fabric that is not all that babyish. There are a couple of prints that come in a cotton/linen blend that is to die for. I bought a yard of it from Cabbage Rose in Ft. Worth earlier this year pretty much just so I could touch it. Maybe it would make a nice bag?
If you want to make your own version of this rag quilt, you will need:
- 1/8 yard cuts of six different prints
- 3/4 yard of flannel for backing
- Rag quilting snips (you can rag with regular scissors but these make it so much easier and faster)
- Coordinating thread since all of your sewing will show
- Optional: scrap batting cut into 4.25″ x 9.25″ rectangles
First…I did not use batting in my quilt. I wanted it to be soft and floppy – the type of blanket my son will drag around through his toddler years. Batting gives the quilt more dimension and warmth (something we do not need in Texas).
Second, my 1/8 yard cuts were pretty straight since they came from a quilt shop. Where they weren’t square, I said to myself “Oh, well, that will add more ragginess” and it all washed out in the end.
Now let’s sew. Cut each of your 1/8 yard strips into four rectangles, measuring 4.5″ x 9.5″. [I ended up with a 4.5″ square of each print to stash for another project.] Cut your flannel into six 4.5″ wide strips by WOF. Sub cut these strips into 4.5″ x 9.5″ rectangles. Lay your print rectangles out in your desired pattern.
Pair each print rectangle with a flannel rectangle, wrong sides together. Some flannel doesn’t have a “wrong” side it’s called double nap) and honestly, the wrong side of flannel doesn’t look at that different when its solid so don’t sweat it. Sew an X across the top of each rectangle set. You can mark this with a pencil if you want perfection, but it’s easy enough to wing it. Can you tell that I like to keep things easy (lazy?)?

Then begin sewing your rectangles together in rows, along the short edge of each rectangle pair, wrong sides (flannel) together. I used my no. 1 foot edge as a guide and that makes a true (not scant) 1/4″ seam. If you want your quilt to be more raggy, use a larger seam allowance. Just keep it consistent and you will aslo need to adjust the size of your batting scraps so you don’t have batting in your rag seams. Does that make sense? If you use a 1/2″ seam, cut your fabric and flannel into 4.5″x9.5″ as suggested above but cut your batting into 4″x9″ rectangles.
Sew your rows together. Be sure to match your seams at each intersection and sew the raw seams open towards the quilt top. After you have assembled the entire top, sew around the edge of the quilt to hold it all together. Now is the fun (or horrid, if you have dull scissors) part. Cut into the raw edge of each block at 1/4″ intervals, using your handy dandy rag quilting snips. After you’ve cut the whole thing up, it will look sad and kind of ruined. But then you will wash it and dry it, and it will look cute and scraggily, like a terrier.
I put mine to use immediately after taking it out of the dryer:

That baby is 32″ tall for reference.
Dimensions: 35″ x 28″
Fabrics: Puttin’ on the Ritz by Bunny Hill Designs for Moda, miscellaneous baby blue flannel from JoAnn’s
Started: July 2012
Completed: July 2012